

Summary
In the first two parts of this series of articles, I explained how to export and fix all of the data from an existing Ghost blog and also how to install Ghost on a new Linux server, using a single command. In this final part, we're going to import our existing blog and make sure everything is updated and working properly before making it live.
In my case, I also changed my URL structure to use dateless URLs. Since you might not be doing that, I've put those instructions in a separate article (not yet published), which will also help you to ensure that your Disqus comments are migrated correctly.
- Part 1: Overview and data export/fix
- Part 2: The best way to install Ghost on your server
- Part 3: Installing and upgrading using a temporary domain and final steps (sorting out redirects, migrating comments, fixing DNS entries, etc) [This article]
- Bonus: How and why you should change your blog URLs to dateless format
Background / Prerequisites
By this stage you should already have exported and fixed your data (see part one which includes scripts to fix the data), created a DNS record for your temporary migration URL (explained here, in part 2), installed Ghost on a new Linux server (part two has a one-line command to do this) and also created .
If you haven't yet done any of this, make sure you read Step 1 from the previous article.
NOTE: If you're upgrading from a v0.x blog you need to install Node.js v10, despite the official instructions telling you to install Node.js v12. This is explained here, in part 1. My script installs Node.js v10, so it's easiest if you just use that.
Once you've done that and installed your new empty blog (using a temporary URL), you're ready to continue. Bear in mind that it's not wise to change the folder name later on. Let's say you're using https://temp.example.com with your real blog being hosted at https://example.com. You might want to install it in a folder called /var/www/example_com.
Import your existing blog content
Using your browser, navigate to your blog at https://temp.example.com/ghost and follow the prompts to set it up. It will ask for your name and email address, although you'll be overwriting these things shortly when you import your old content, so feel free to use a different email address if you like.
When you've logged in, go to Settings → Labs → Delete Content and get rid of the sample posts. Now go to Settings → Labs → Import Content and upload the json file you exported and fixed in part 1 of this series.
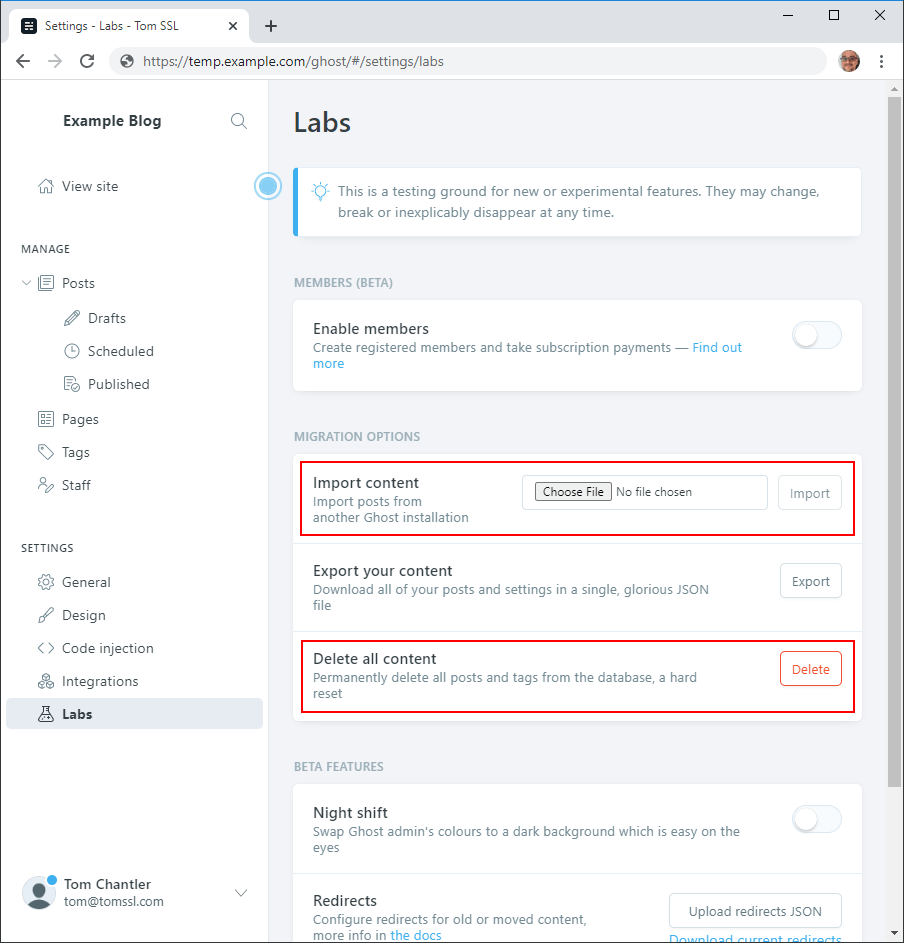
Now check that your site looks vaguely okay (although none of the images will be there yet). At this point you can upload the images folder which you backed up (also explained in part 1). If your blog is installed at /var/www/example_com then the images folder will be at /var/www/example_com/content/images.
NOTE: If you had dates in your URLs before, you will notice that you haven't any more and that you can't find the option to enable URLs with dates. The best way to fix this is to download the
routes.yamlfile fromSettings → Labs → Routesand change thepermalinkpart of thecollectionssection from this:
permalink: /{slug}/
to this:
permalink: /{year}/{month}/{day}/{slug}/
And then to upload it again. However, I don't think that you should, as I explain in How and why you should change your blog URLs to dateless format.
Sort out your email settings
For some reason the export/import doesn't deal with email settings, so you need to fix those manually. Unless you're using Mailgun (which can be set through the admin interface), you'll probably need to edit config.production.json by hand and then restart your blog. Like this.
cd /var/www/example_com
nano config.production.json
ghost restart
+ sudo systemctl is-active ghost_test-example-com
+ sudo systemctl restart ghost_test-example-com
✔ Restarting Ghost
Here are my before and after versions, to give you an idea of what to do (remember, you should be using your original configuration to guide you here).
I changed this section of config.production.json
  "mail": {
    "transport": "Direct"
  },
to this
  "mail": {
    "transport": "SMTP",
    "options": {
      "service": "SendGrid",
      "auth": {
        "user": "[email protected]",
        "pass": "secretpassword"
      }
    }
  },
You can find more instructions about this at https://ghost.org/docs/concepts/config/#mail. Something important to note is that this is a proper json file, so you need to have double quotes around all your strings, whereas you didn't if you were hosting in Azure App Service using config.js.
If you did the initial configuration of your new blog using a different email address then, when you log in as your original (imported) user, it will make you update your password (see image). It does this by sending an email and, if you haven't updated your email settings, it will send using the Direct protocol, which may not work. If you forgot to update your email settings and you didn't receive your password reset email, don't worry. If you try to login again after you've updated your email settings it will try to send you another password reset email.
Update your blog
If you're migrating from an ancient version of Ghost (like I was) and you had to install your new blog using ghost install --v1 then now it's time to update. To do this, go to the home directory for your blog (e.g. /var/www/example_com) and run:
ghost update
You will need to check that your theme is compatible with Ghost 3.x. You can use the official tool to do this: https://gscan.ghost.org/. If it's broken and you don't have the time (or energy) to fix it, you could do what I did and get a new theme.
NOTE: After you've copied your images to your server, it's possible that when you run
ghost updateit will give you some errors about permissions. Fortunately it will also give you the commands to use to resolve those errors, so don't worry if that happens.
e.g.1) Checking file permissions Message: Your installation folder contains a directory or file with incorrect permissions: - ./content/images/2020/06/someimage.png Run sudo find ./ ! -path "./versions/*" -type f -exec chmod 664 {} \; and try again. 2) Checking content folder ownership Message: Your installation folder contains a directory or file with incorrect permissions: - ./content/images/2020/06/someimage.png Run sudo chown -R ghost:ghost ./content and try again.
Once you're satisfied that everything is working, it's time to put your new blog live.
Finalising the migration / going live
In order to put your blog live, there are a few final steps.
Rename your blog in Ghost (and update its URL)
Navigate to your folder (e.g. /var/www/example_com) and run:
ghost config url https://example.com
ghost setup nginx
NOTE: After you change your blog URL, the Ghost-CLI will not remove your temporary URL automatically. This means that nginx will still respond to requests for https://test.example.com as well as https://example.com. You could use this to your advantage during DNS propagation (see Update the DNS entries below).
When you want to stop serving the site on the test URL, you need to delete the nginx configuration. You will need to delete two files (test.example.com.conf, test.example.com-ssl.conf) from three different locations (/etc/nginx/sites-enabled, /etc/nginx/sites-enabled, /var/www/tomssl/system/files), which is six files in total. They're symbolic links in two of the folders, of course, but you can still delete them using rm.
/etc/nginx/sites-enabled/test.example.com.conf/etc/nginx/sites-enabled/test.example.com-ssl.conf/etc/nginx/sites-available/test.example.com.conf/etc/nginx/sites-available/test.example.com-ssl.conf/var/www/example_com/system/files/test.example.com.conf/var/www/example_com/system/files/test.example.com-ssl.conf
Now you need to reload your nginx configuration. The best way to do that is to check that the configuration is okay, with:
$ nginx -t
nginx: the configuration file /etc/nginx/nginx.conf syntax is ok
nginx: configuration file /etc/nginx/nginx.conf test is successful
And then to reload it with service nginx reload or /etc/init.d/nginx reload.
Update the DNS entries
Now you should update DNS to point to your new server. You should already know how to do this. Since your old site is still live, you could put in a reverse proxy and tell it to retrieve the new site from your temporary URL (making sure you haven't just deleted the old nginx configuration). However, the easiest plan is not to worry about any complex redirects or reverse proxies or anything but, rather, simply to accept that the DNS change will take some time to propagate. However, it's worth doing what you can to speed things up.
Clear the public DNS caches [optional, but recommended]
After I updated the DNS entry for this site, I cleared the DNS caches at a few major sites:
- Clear DNS cache at CloudFlare: https://1.1.1.1/purge-cache/
- Clear DNS cache at Google: https://developers.google.com/speed/public-dns/cache
- Clear DNS cache at OpenDNS: https://cachecheck.opendns.com/
Get a new SSL certificate
Finally, you need to get a new SSL certificate for your blog as it will still have the old certificate (e.g. https://test.example.com). However, you can't do this until DNS resolves properly (hence the desire to flush the DNS cache). The command you need is:
ghost setup sslAfter you've updated your DNS entries (and cleared the public DNS caches), you can flush the DNS cache on your Ghost server as well. Since I'm using Ubuntu, the command to flush the cache is sudo systemd-resolve --flush-caches.
If you're worried about people coming to your site and seeing the wrong certificate during the period between updating your DNS settings and obtaining your new SSL certificate, there are many ways round this. For example, you could use CloudFlare as your DNS provider and use one of their free SSL certificates and set it to Full instead of Full (strict), just until you're able to setup your new SSL certificate. This is probably the best solution if you already use CloudFlare as your DNS provider (as I did). However, in the end I found that changing the DNS entries and purging the public caches was sufficient (meaning that I was able to get my new SSL certificate almost immediately; I didn't even need to purge the cache on my Ubuntu server).
Migrating comments
If you're using an external commenting service (such as Disqus, like I am), then the comments are linked to specific URLs and, as long as you're not changing your blog URLs, you shouldn't need to do anything. Setting up Disqus involves editing one of the files in your theme (which you must have already done if you're migrating from an earlier version of Ghost). In any case, it's explained at https://ghost.org/integrations/disqus/.
If you are changing to dateless URLs, then see my instructions at How and why you should change your blog URLs to dateless format [not yet published].
Sort out any redirects
If your site has any existing redirects which are not being handled by Ghost, now is the time to fix them. This is done via a redirects.json file which is accessed from Settings → Labs → Redirects. This is explained in more detail in How and why you should change your blog URLs to dateless format [not yet published]. In the meantime, here is a simple example:
[
	{
		"from": "/ghost-install.sh/",
		"to": "https://raw.githubusercontent.com/TomChantler/Ghost-Install/master/ghost-install.sh",
		"permanent": false
	},
    {
		"from": "/ghostdatafix.ps1/",
		"to": "https://raw.githubusercontent.com/TomChantler/Ghost-Data-Fix/master/GhostDataFix.ps1",
		"permanent": false
	}
]
Done
That's it. If you got this far then congratulations. You probably deserve a medal or something.
Each time you want to update your blog to the latest version, you just need to go to the home directory (e.g. /var/www/example_com) and run ghost update. That's a lot easier than all this other stuff we had to do to get to this point.
Conclusion
In this article, we learnt how to migrate a Ghost blog to a Linux server and get everything up to date (after not having done so for several years in my case). The whole process was quite involved, so let's recap what we've done over this whole series of articles:
- Exported a Ghost blog (as json) from the Ghost admin panel;
- Downloaded all of the images from
/content/images; - Downloaded a backup of everything, just in case [this is very important];
- Fixed the exported json file to fix the markdown trick I'd been using to open external links open in a new window [you may not need to do this if you didn't try to be as "clever" as I did];
- Fixed the exported json file to change all of the local image links to be lower case [this may well be necessary if you've been hosting on Windows];
- Installed Ghost on a new Ubuntu server;
- Imported the blog using a temporary URL;
- Uploaded all of the images to the new Ubuntu server;
- Changed all of the image filenames to be all lower case;
- Updated the blog;
- Updated the theme [I actually got a new theme and that's not covered in this article];
- Renamed the blog in ghost (and changed back to the real URL);
- Changed the DNS entries;
- Set up SSL;
