

Summary
If you've got an old installation of Ghost and you want to upgrade it, then the official documentation is probably a good place to start.
However, even if you read the documentation, there are a few things which might catch you out, especially if you're trying to change more than one thing at once.
In this series of articles I'm going to explain how I upgraded this blog from Ghost 0.11.0 to Ghost 3.14.0, including changing to dateless URLs (without breaking any links or comments) and also changing over to Linux hosting (so that I can use the excellent Ghost-CLI to keep everything up-to-date more easily).
- Part 1: Overview and data export/fix [This article]
- Part 2: The best way to install Ghost on your server
- Part 3: Installing and upgrading using a temporary domain and final steps (sorting out redirects, migrating comments, fixing DNS entries, etc)
- Bonus: How and why you should change your blog URLs to dateless format
In this article, we're going to backup our existing blog and then apply any data fixes we might need. To help with this, I've written a PowerShell script which does nearly everything for you:
 TomChantler
Background
When I was about to start writing this blog at the end of 2014, I decided that I wanted to use Ghost and that I wanted to run it in Azure. I also wanted to force it to use SSL and it was all quite painful to set up. So painful, in fact, that you probably shouldn't read this post I wrote back then telling you how to do it.
A consequence of this was that, since it was equally painful to upgrade, I didn't do that very often. Fast forward more than five years and, about a week ago, I noticed that my blog was still running on Ghost 0.11.0, which was released in September 2016. Suitably chastened, I decided I'd better upgrade it straight away and, as is often the case with anything involving computers, some aspects of this were quite complicated. If you're in a similar situation then this series of articles will make it easier for you.
Procedure
Here's a list of what I wanted to do:
- Update the Ghost software and make it easier to update in future
- Fix the markdown trick I was using to make external links open in a new window
- Change hosting operating system from Windows to Linux (so that I can use the Ghost-CLI)
- Change hosting providers (which meant the DNS entries were going to change)
- Change the URL structure (to remove the date from each post)
- Get everything running in a test area, before switching over to live
- Preserve Disqus comments
- Not break any links (including the custom redirects I was doing in IIS)
And here are the steps I took to do it (with links to other articles where appropriate):
Step 1: Back up everything
Whatever you're doing, the first step you should do is to back up your existing installation, just in case. If you're running in Azure App Service, like I was and you've been taking backups regularly (including making sure the SQLite database was being backed up correctly, as explained in this article), then it's simply a case of downloading the zip file from Azure Storage. With a bit of luck, you won't need that full backup, but you'd better have it, just in case.
The things you will definitely need are an export of your database and everything in the content/images folder. You will probably need to update your theme and I'm not going to cover that here (it might be best either to use the built-in default theme, Casper, or get a new one from the marketplace).
If you've got a backup from Azure App Service, the bit you need is in this folder:
fs\site\wwwroot\content\images
Step 2: Export your database
Ghost has decent Import/Export tools built in. Login to Ghost Admin and navigate to Labs and export your data. It will download a json file named something like your-blog.ghost.2020-04-30.json containing nearly everything. The only things you might need that it doesn't export are your images, your theme and your email settings. The email settings are stored in the config.production.json file in the root folder of your blog (or wwwroot\config.js if you were using Azure Web Apps).
Step 3: Fix your exported data
The easiest way to fix your exported data is to use the PowerShell script GhostDataFix.ps1.
Let's see how to use it and what the options mean.
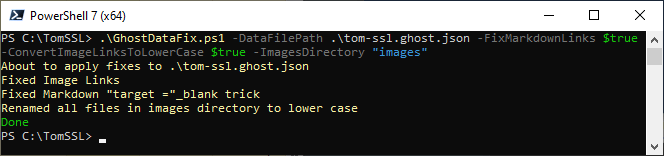
PS >.\GhostDataFix.ps1 -DataFilePath .\tom-ssl.ghost.json -FixMarkdownLinks $true -ConvertImageLinksToLowerCase $true -ImagesDirectory "images" You can use any combination of the following parameters (example based on the actual values used above):
-DataFilePath .\tom-ssl.ghost.json
-FixMarkdownLinks $true
-ConvertImageLinksToLowerCase $true
-ImagesDirectory "images"
-DataFilePath
This is fairly self-explanatory. Just point it to your data file (and don't worry if it's in a separate folder as the fixed data will be written alongside it). The filename will have one or both of the following inserted before the file extension: .imagesfixed or markdownfixed.
Thus -DataFilePath .\tomssl-ghost.json will result in a fixed data file called one of the following, depending on which options you choose:
tom-ssl.ghost.imagesfixed.json
tom-ssl.ghost.markdownfixed.json
tom-ssl.ghost.imagesfixed.markdownfixed.json-FixMarkdownLinks
If you're anything like me, you might have been using a trick to ensure that all of your external links open in a new window. If so, then use the C# console app in the GitHub repo to fix your exported data. I should probably explain...
Basically, when I added a link in Markdown, instead of doing this:
[TomSSL](https://tomssl.com)I inserted " target="_blank before the closing parenthesis and did this instead:
[TomSSL](https://tomssl.com" target="_blank)Doing this made the link open in a new tab and also felt really cunning and a bit reminiscent of an XSS attack. However, it stopped working with Ghost 1.0 and meant that all of my links were rendered as they were written, so it looked terrible. I didn't have the time or patience to try to change them all manually (there were hundreds), so it was yet another reason not to upgrade.
I needed to come up with a way to change them all back, but I couldn't just do a simple search and replace on " target="_blank in case I'd introduced extra spaces, or it was a comment in some code and note part of a link, or I'd made an error in the first place and mistyped the blank part (yes, I really did do this).
Due to the different ways you might construct a legitimate Markdown link, fixing these links was really quite complicated. Check out the regular expression in the script if you don't believe me.
$patternForMarkdownLinks = "(?<linkpart>\[[^\]}]*\]*)\s*\((?<scheme>https?:\/\/)?(?<address>[^\[\""]*?)(?:[\\])?(?<target>""\s*target\s*=\s*\\*\""\s*_.*?)\)"
-ConvertImageLinksToLowerCase
I was running Ghost on Azure App Service, which ultimately runs on IIS on Windows. Whilst IIS actually is case-sensitive (although it usually doesn't appear to be), the windows file system isn't and thus links to real files are not case-sensitive. I had used mixed case when naming files, such as my original background image, which was called TomSSL_Background_NYC.jpg, but I hadn't always been careful when linking to the images. This meant I'd got various differently-cased links to the same images throughout my blog (e.g. that background image). They worked because I was using Windows. If I switched to Linux, they wouldn't work.
Since I wanted to use the Ghost-CLI to install and maintain my blog and since that runs best on Ubuntu (and Linux hosting is case-sensitive), this meant I couldn't migrate to Linux hosting without fixing things somehow (and writing something clever to tell the web server to fix erroneous links would cause a performance hit, so I wanted a fix I could apply).
Bearing this in mind, I decided that I needed to rename all of my images to be lowercase and then to rewrite the links to them in my data export before reimporting it into my blog.
-ImagesDirectory
This will recursively rename all of the files in the directory to be lowercase. So point it at your content/images directory (but remember to keep your original backup safe, as this will overwrite the files).
If you've already uploaded your images to your new hosting and you haven't got PowerShell installed there, don't worry. I've got you covered.
To rename on Linux:
~# find /var/www/tomssl/content/images -depth | xargs -n 1 rename -v 's/(.*)\/([^\/]*)/$1\/\L$2/' {} \; > after.txtI renamed my files after I'd uploaded them to my Linux server. Here's a snippet of after.txt (the log created by the command above).
/var/www/tomssl/content/images/2014/12/TomSSL_background_NYC.jpg renamed as /var/www/tomssl/content/images/2014/12/tomssl_background_nyc.jpg
Conclusion
By this point, you should have got your fixed data export (with a name like tom-ssl.ghost.imagesfixed.markdownfixed.json) and you should have renamed your images, so that the filenames are all lowercase.
Next time we'll install Ghost with the Ghost-CLI (using a temporary URL, like https://test.example.com), get it all upgraded to the latest version, sort out any redirects, make sure our Disqus comments aren't lost and, finally, change the URL to match our existing blog and change our DNS records to point to the new blog.
