

This is Part 2 of a two part series.
- Part 1: Running your own email server with Mail-in-a-Box
- Part 2: Migrating your email to Mail-in-a-Box [this article]
I'm not sure if it's due to age-related intimations of mortality but, for whatever reason, I seem to be at the stage where, when I need to explain anything fairly technical like this, I feel compelled to publish it on the public internet.
Other people have written about this before, notably Jon Udell and Scott Hanselman and Scott even created an online tool to hammer this point home. But I digress and time is short.
Summary
This article deals with switching over to use a new email server without losing any emails or otherwise messing everything up. Whilst it assumes that you are using your own domain and that your email address is not changing, it's not really specific to Mail-in-a-Box.
By following these instructions, you'll be able to migrate your email account to your new server without anybody noticing (unless they start looking at email headers, etc).
To make life even easier, this is my first interactive article. Simply enter your email domain and the identity of your new mail server below, click update and it will update the rest of the article accordingly and also change the browser URL, so you can copy it and send it to anybody else who needs to migrate their account.
Enter domain:
Enter mail server:
When you click the update button, these bits will change to match the server details entered above:
Domain: example.net
Mail Server: box.example.net
If you're a person who has no interest in how anything works[1] and you've been sent here to set up your email then you only need to read the highlighted bits.
Background
I have recently set up a new email server for my family. To achieve this, I used https://mailinabox.email/ (and I explained how I did that in Part 1).
The reasons for doing this are various, but include the fact that our existing setup caused some messages sent by us to be flagged as being SPAM and also allowed anybody to send messages purporting to be from [anyone]@example.net[2].
To illustrate this point, here is an excerpt of an email I sent to my parents a while ago, in which I warned them that this was a problem:
For example, this message has been sent ostensibly by [email protected], which is not an email address that exists, so don't write to it (although if you click reply, it will use my real address).[3]
How does email work on my device?
When you set up an email account on a device (such as a computer or mobile phone), it needs separate settings for sending and receiving email. Receiving email is done via a POP or IMAP server and sending email is done via an SMTP server. Quite often these are both the same machine and, indeed, that's the case when using Mail-in-a-Box.
POP (actually POP3) is generally not the first choice, for several reasons, including the fact that messages are only retrieved by polling according to a schedule, whereas IMAP (actually IMAP4) means that you are notified of new messages as they arrive. In other words, POP is pull whereas IMAP is push. My advice is to choose IMAP if you can. If you're not sure, read this (and then choose IMAP).
Once the Mail-in-a-Box server is running, then what?
Since it would be annoying to lose any emails, it is necessary to exercise caution and to switch over in two steps. The entire process of changing over should only take as long as it takes your DNS records to propagate (theoretically up to 72 hours, but usually much less).
Preliminary steps
DNS records
Whilst your Mail-in-a-Box server is configured to serve its own DNS records, it's possible to host your DNS elsewhere and also necessary until you have switched everything over and your records have propagated. Therefore the first step may be to add/edit a couple of DNS records.
Check your existing SPF record (you're only allowed one for each domain) and, if necessary, add your new Mail-in-a-Box server via the inclusion of include:box.example.net.
e.g. v=spf1 mx -all becomes v=spf1 mx include:box.example.net -all. If you don't already have an SPF record, don't worry about it for now.
Add the DKIM record (which may be found by logging in to https://box.example.net/admin/ and then selecting System → External DNS). It will be of the format:
mail._domainkey.example.net TXT v=DKIM1; k=rsa; s=email; p=[a long jumble of seemingly random characters]
In practice, this means you need to go to your DNS host and add a TXT record called mail._domainkey (you should omit the example.net part). This is what it looks like for CloudFlare:

As luck would have it, without a DMARC record instructing to the contrary, DKIM failures are not a cause for concern. DMARC tells the receiving mail server whether or not email from example.net is protected by SPF and/or DKIM and what should be done in the event of this authentication failing (e.g. should it reject the mail, mark it as junk, etc). The receiving server goes to DNS to request the DMARC record so it knows what to do. This means that you should only need to edit your existing SPF record (or create one if you don't already have one) and add a DKIM record.
How to perform the switchover
I had a lot of thoughts about the easiest way to switch over and I came up with something which I thought was good, but which I couldn't actually do. The overview for the users went like this:
-
First you need to start using the new mail server to receive messages and also to send all of your example.net email. This means you need to add a new account and change just the SMTP server of your existing example.net email account.
-
You need to continue to receive messages using your old email account, so you are receiving from both.
-
[optional] You might like to copy some messages from your old account to your new one. This can easily be done by using an email client like Thunderbird or Outlook and dragging the messages from one folder to another.
-
Once the changeover is complete and you are no longer receiving messages in your old account, you can stop using it.
This all makes sense and would work quite well if you had any control over any of your users.
What if I can't get all of my users to make this switch at once?
In the real world, it's very difficult to get several people to do anything at the same time, especially when some of them barely know which side of the keyboard to mash with their fists and also don't have an appreciation for how exciting this stuff can be[4]. Perhaps you've seen the first episode of Jeeves and Wooster, starring Stephen Fry and Hugh Laurie. If you haven't, you should because it's funny and this bit describes my family email server situation fairly well.
"And if I might say so, sir, any undertaking that requires the presence of four people in one place at the same time while two of them are unaware of the fact, is fraught with the possibility of mishap, sir."
If this applies to you, then the best strategy is to set up each person's new account so that it will forward all mail to their existing account, as well as retain a copy. That way everything will be waiting for them when they finally switch over. If you are going to do this and they already send mail purporting to be from [email protected], then you need to make sure that your new SPF record allows this, at least until everybody has transitioned.
How to forward mail to your old account
(if you've been sent here by me, I've already done this bit for you)
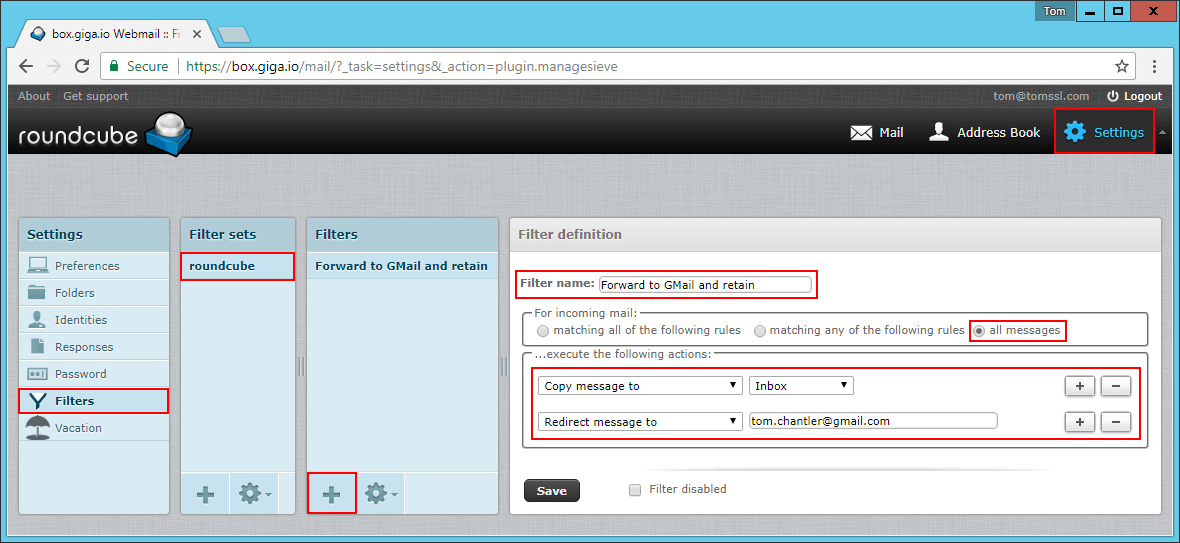
Login to Roundcube. Go to Settings → Filters → roundcube → + (add) and create a filter that acts on all messages, copying them to the Inbox and then Redirecting them to your old account. Remember to give your filter a suitable name.
I had to do precisely this for a couple of the accounts I created for my family members. For the sake of clarity, I thought it would be best to call the rules names like Forward to OldMailProvider and retain (see image below).
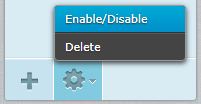
Once they start using their new account, they should disable or delete this filter by selecting it and clicking on the gear icon as shown below. As the administrator, make sure you remember to make the SPF record strict again once all users have migrated.
Thus the administrator needs to:
- Setup the new email server to forward the users email to their old receiving accounts and retain a copy in the inbox.
- Relax the SPF record so that their existing sending servers are permitted to send.
NOTE: There are absolutely loads of ways you could effect the switch over, including steps such as adding a new mail domain (or subdomain), such as mail.example.net, to your new mail server, setting that as an alias of your new account and forwarding all of your old email to that new alias. However, when dealing with
idiotsless technicalrelativesusers, I think the above is the least complicated approach.
Add your new email account to your devices
I want you to set up a new account for [email protected] and to use these settings:
| Receiving Server Settings | |
|---|---|
| Setting | Value |
| Receiving Protocol/Method | IMAP |
| Mail server | box.example.net |
| IMAP Port | 993 |
| IMAP Security | SSL or TLS |
| Username | Your full email address |
| Password | Your mail password |
| Sending Server Settings | |
|---|---|
| Setting | Value |
| Mail server | box.example.net |
| SMTP Port | 587 |
| SMTP Security | STARTTLS (“always” or “required”, if prompted) |
| Username | Your full email address |
| Password | Your mail password |
Sending email from different aliases
This is quite a nice feature. To illustrate the point, let's consider the fact that I might want to send emails from tom, info or [email protected].
One of these is the main account and the others are just aliases which have been configured in MiaB. If you need to send emails from separate accounts @example.net, just get your administrator to set them up as aliases for your account. This is automatically done for a few standard addresses like abuse@, administrator@, hostmaster@, postmaster@ and can be accessed by going to https://box.example.net/admin, logging in as an administrator and then going to Mail → Aliases.
Some relevant background information about how email works
Email works by having one (or more) DNS records called MX (Mail eXchange) records for each addressable domain. In other words, if you want to use example.net for email, you need at least one MX record. You can see the example.net DNS records by going here: https://who.is/dns/example.net
[Bearing in mind that this is a dynamic web page, you might see anything at that link, but in the case of my family, the following was true]
You will notice two MX records. These servers are tried in order of ascending priority and, in that order, they are: mx0.123-reg.co.uk and mx1.123-reg.co.uk. You don't need more than one server because email is not really that time-sensitive as far as the internet is concerned (despite some people believing otherwise); if the server was switched off for 24 hours, the email would still get there.
In theory, once you start using the new server, you won't receive any email on it until there are some MX records in DNS marking it as being a mail server for example.net. However, the way email works is a bit like this:
When you send an email, the outgoing (SMTP) sending server first checks to see if it knows the recipient. If it doesn't, the message is then sent on. Since all of our example.net addresses reside on the new server, this means that if we send messages to each other, the internal lookup will find those addresses and the messages won't ever go out into the ether.
In other words, all emails sent from example.net to example.net will stay inside the new server, whereas all other emails will continue to go to the old server(s).
This is a really important point to note. If you forget this fact you might waste a bit of time thinking that things aren't working properly when they are.
Why this might be a problem
Interestingly, after I moved one of my email domains away from Office365 it didn't actually work in all cases and some mail was routed to the old place until I deleted the domain from inside Office365. If you think about this, it makes some sense. When sending email from within Office365 (not just from within my own Office365 account), it's possible that it just knew to keep those messages within Office365 and to send them to my old account and didn't bother to check the external DNS records. Whatever the precise reason, the bottom line is this: inform your old mail provider that you've gone otherwise other servers might just "know" where to send the mail as they consider the old MX server to be authoritative (despite that not being the case).
One final note about switching from Office 365: I noticed that Office365 seemed to cache my settings for an hour or two and that resulted in some of my email sent within Office365 being undeliverable for an hour or two. If I'd made sure I hadn't hardened my SPF record until I'd made this change, it wouldn't have been a problem.
Checklist (but admins please read the whole article)
To recap, after setting up your server as described in Part 1, you just need to:
- Set up new accounts for everybody.
- Create rules to forward their emails to their old provider and also retain them on the new server (or choose another strategy, but this worked best for me).
- Edit your existing SPF record to include your new MiaB server.
- Add your new DKIM record.
- Change your MX records to point to your new server (either by using your new server as your DNS server (best), or by modifying your existing DNS settings with your current provider).
Once the DNS propagation has taken place, all of your email will arrive in your new server. And then, once everybody has migrated over (i.e. has updates all of their email clients), you should harden your SPF record so that only your new server is allowed to send mail from example.net.
Conclusion
Mail-in-a-Box is a great way to take back control of your email and move back towards it being a decentralised service, as was initially intended. I really enjoyed setting it up for my family and, bearing in mind what I wrote about governmental snooping, it feels good to be in charge of our personal correspondence. And it's free (other than the cost of a server).
Why not give it a try?
Don't forget to let me know how you get on in the comments section below and follow me on Twitter for more frequent updates. Follow @TomChantler
All images created by me, except the main padlocks header image which was created by: bluebay/Shutterstock.com
Also, I'm sorry, but we probably can't be friends; how can you not want to know how everything works?! ;-) ↩︎
If you want to use a generic domain in an article, you can prevent nasty surprises by using one of these: https://www.iana.org/domains/reserved. I tend to use example.com (or .net). ↩︎
I'm afraid I really do communicate with my family like that, but mostly for the purposes of amusement. ↩︎
Yes, of course my tongue is in my cheek. ↩︎

