

Summary
If you're using Cloudflare then, if you have any long-running web requests, you may have noticed that the default timeout of 100 seconds can not be extended under the free tier. Of course you shouldn't really have any web requests that execute for that long, but in the real world (and with legacy applications), things are not always perfect.
Recently I put a legacy application behind Cloudflare for the first time and one of the long-running tasks (which was invoked periodically, as a kind of cron job) stopped working.
In this article I will show you a simple way to get round this problem to bypass Cloudflare for your long-running tasks without exposing your IP address through the DNS system.
Background
I really like Cloudflare and they offer a lot of very good services for free. I use them as a free DNS provider, both for DNS lookups (via their 1.1.1.1 DNS service) and for DNS hosting for my own domains. I even use them as my domain registrar, where possible.
When you use Cloudflare to host your DNS records, for non wildcard A, AAAA and CNAME records, you can elect to pass your traffic through their servers, even on the free tier. This means that any DNS request for those records will return the IP address of the nearest Cloudflare proxy server and not your origin IP address. This is represented visually as an orange cloud in your DNS settings, like this (in this faked example, 1.2.3.4 is my origin IP address and is only visible to me in the Cloudflare dashboard. If you ping tomssl.com, it will return a different IP address):

The Cloudflare Orange Cloud means you're using IP Masking, Caching and a free SNI SSL certificate (I'm also using Let's Encrypt behind the scenes, as you might expect). This is all great and, if you're not already using Cloudflare, you should definitely consider it.
The Problem
About a week ago I was volunteering some time to help to reduce costs for a non-profit and saw that, not only were they were paying for an SSL certificate, they were also paying for a dedicated IP address for a single, legacy web app. It only took a few minutes to get them onto a shared IP address with their hosting provider and to get their website using Cloudflare and everything seemed okay. However, it soon became apparent that there was a scheduled task hitting an HTTP endpoint which ran every few minutes and which was no longer working. A look at the logs (just kidding, there weren't any logs; what I really did was to visit the endpoint manually, in a browser) revealed that the request was timing out.
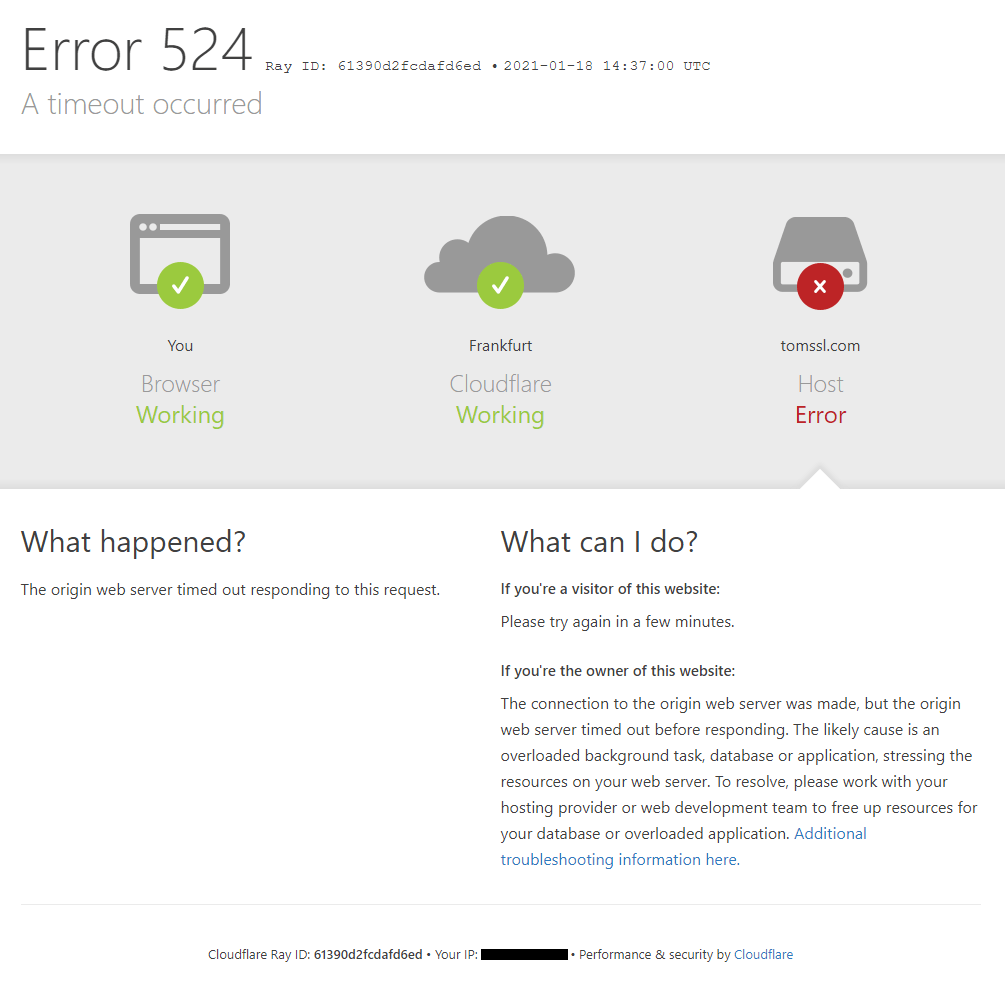
I got a 524 error which looked like this (I've altered the details, of course) which contained a link explaining the 100 second timeout, describing how Enterprise customers can increase the timeout to 600 seconds (ten minutes) and also offering some advice about how to combat the problem.
One of their suggestions is:
"If you regularly run HTTP requests that take over 100 seconds to complete (for example large data exports), move those processes behind a subdomain not proxied (grey clouded) in the Cloudflare DNS app."
Whilst I agree that such tasks should not be run through their service, I had just changed to a new (shared) IP address and was keen to continue to take advantage of the IP-masking capability offered by Cloudflare. This meant I didn't want to create a separate subdomain like direct.tomssl.com (again, I've changed the domain) which has a "grey cloud" on Cloudflare and point it to the same IP address as the main A record, which has an "orange cloud". Indeed, they even caution against this in the DNS dashboard.

The Solution
I decided I needed to bypass Cloudflare without resorting to a non-proxied subdomain. I also wanted to set up a new way to run this task, as it was being run using some kind of weird third-party service which also wasn't free (don't ask). I decided to schedule the curl command to run every five minutes, using crontab on a Linux server.
Due to the fact that the legacy website in question is now running on a shared IP address, it's necessary to pass the host header in the request, so that the receiving web server knows from which web site to retrieve content. Thus it seems I want to override DNS resolution for a specific address. This is the sort of thing that might make you think hosts file, especially if you've read about the excitement I've had doing this before. However, I only want to override the IP address for long-running tasks; I don't want to override the IP address for all requests to this host.
At first, I thought I could just set the Host header using --header "Host: tomssl.com" in the curl command, but that won't work if you have any redirects that go to another host, as it will still send the same spoofed header.
The correct flag to use is --resolve. From the documentation:
--resolve <[+]host:port:addr[,addr]...>
Provide a custom address for a specific host and port pair.
I want to follow any redirects, so I need to use the --location (or -L) flag and, since I also don't want to report progress, I am using the -s (silent) flag. Thus my command becomes:
curl --resolve example.org:443:1.2.3.4 https://example.org/path?and=query -sLNote that if you want to resolve both port 80 (HTTP) and port 443 (HTTPS) for a single host, you will need to add two --resolve entries, like this contrived example which covers the case where the initial request is redirected from HTTP to HTTPS:
curl --resolve example.org:80:1.2.3.4 --resolve example.org:443:1.2.3.4 http://example.org/path?and=query -sL Another option is --connect-to, which allows you to provide a hostname, instead of an IP address. As the documentation explains:
--connect-to <HOST1:PORT1:HOST2:PORT2>
For a request to the given HOST1:PORT1 pair, connect to HOST2:PORT2 instead.
This wasn't pertinent to my situation as my requirement was that I be able to reach the server without exposing the (known) IP address through a public DNS record.
Now that I had my curl command, I just needed to schedule it, so I logged on to my Linux server and ran crontab -e and added the following line:
*/5 * * * * /usr/bin/curl -m 240 --resolve tomssl.com:443:1.2.3.4 tomssl.com/longrunningtask?a=1 -sL &>/dev/nullNote that the -m flag sets a timeout of 240 seconds, or four minutes (which seems wise for a task which is run every five minutes, otherwise I might end up with multiple instances running simultaneously) and the &>/dev/null simply means that all output should be discarded. If you use this, you might want to log your output, perhaps by substituting something like >> /var/log/mytask.log for &>/dev/null.
Other possible solutions
I could also have told curl to use specific DNS servers for this request, by using the --dns-servers flag, which the documentation describes thus:
--dns-servers <addresses>
Set the list of DNS servers to be used instead of the system default. The list of IP addresses should be separated with commas. Port numbers may also optionally be given as:<port-number>after each IP address.
However, this wasn't really appropriate in this case. Remember I knew the origin IP address as it was set in my DNS record in Cloudflare, so I just needed to copy it from there.
I could also have used a tool other than curl, but it was by far the easiest solution I could think of.
Conclusion
In this article I briefly extolled the virtues of the free tier of Cloudflare and we saw how you can prevent long-running tasks run over HTTP from timing out when using Cloudflare, without exposing your origin IP address in any public DNS records. I'll admit it's quite a niche subject area, but it was a real thing I had to do recently, so there's probably somebody else out there in the same situation.
Image credit: Me. A photo I took when working in Luton that sort of says "bypass cloud flare".