

The quick Wix fix for kicks
Summary
UPDATE 2017-09-27: FRIEND'S WEBSITE GONE AND WIX SSL INSTRUCTIONS MOVED My friend's website was for a specific event and was not renewed, so now it is owned by someone else and points somewhere else. So don't bother visiting it. For updated Wix SSL instructions, check here: https://support.wix.com/en/article/about-ssl-and-https. Also, be aware that I am not renewing my Wix subscription, so https://tomgetsfit.com will not point to my Wix site from 2017-10-25.
UPDATE 2017-02-02: WIX NOW SUPPORT FREE SSL VIA LET'S ENCRYPT This is great news. They have instructions here: https://support.wix.com/en/article/request-adding-an-ssl-certificate-https-to-your-site
UPDATE 2016-12-04: THIS WORKS FOR SOME DOMAINS. If I was paranoid (and maybe had delusions of grandeur), I'd wonder if Wix had read this article and had stopped this from working on purpose. Why would I wonder that? Well, the two domains I mention here don't work as I described, whereas others still do. As of now, I've turned off all of the CloudFlare stuff and https://www.fullcyclechallenge.co.uk and https://www.tomgetsfit.com each issue a 301 permanent redirect to HTTP, whereas a couple of other sites belonging to my friends still show the incorrect certificate challenge as described by Wix in their support documentation. Why has this changed? I have no idea.
UPDATE 2016-11-15: THIS IS NOW WORKING AGAIN. *I guess Wix are experimenting with some stuff around SSL as this is now working again, but the wildcard certificate they issue now references .wixanswers.com, which is not the same as it was before. Before trying it yourself, check if it is still working by trying to visit https://www.fullcyclechallenge.co.uk.
UPDATE 2016-11-14: Wix have changed something and this does NOT work any longer. Read the comments thread below for more information. If I can get it working again I'll update the article.
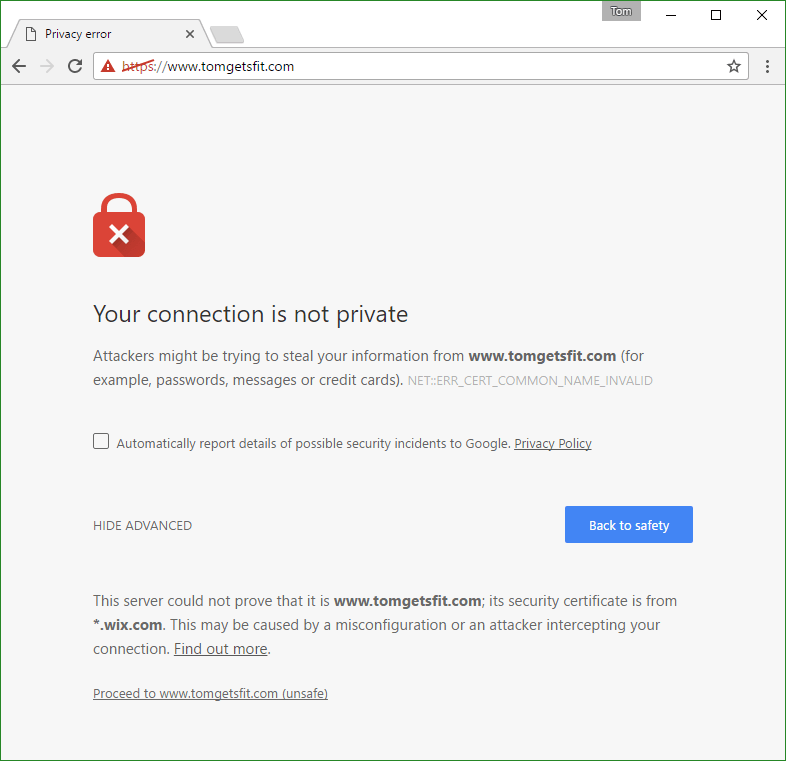
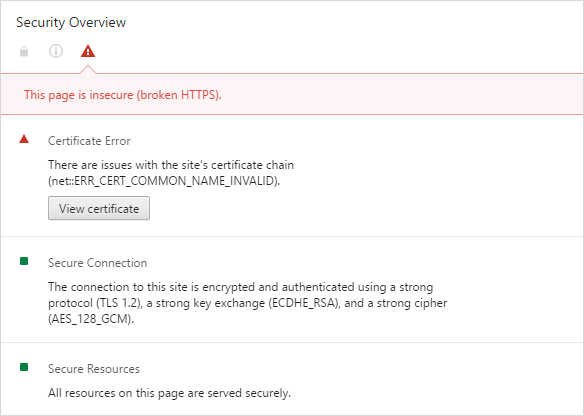
If you've got a Wix website (and quite a lot of people have), then you are almost certainly not serving it over HTTPS because Wix don't support SSL. This is not ideal, but I have a simple way to fix that so you can turn this

and this

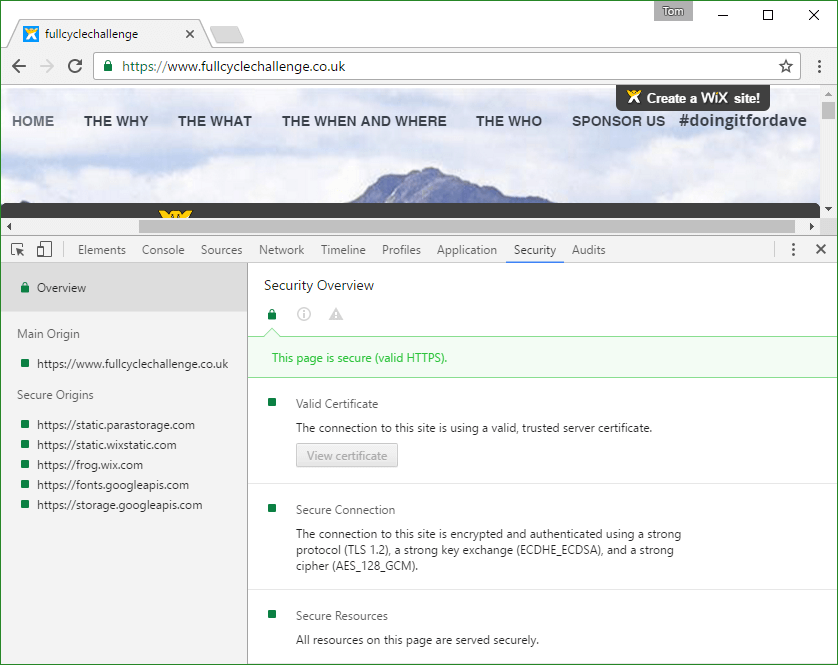
into this

What's more, it should only take you about five minutes of effort to do it (although you may need to wait slightly longer than that for DNS propagation and for your free SSL certificate to be provisioned, but there won't be any downtime).
I should mention (and you will see if you click the Wix link above) that any payments made through your Wix site are said to be made securely and I have no reason to doubt that statement (they must not go via your personal domain). I don't have an axe to grind with Wix, I just want everyone to serve their websites securely. I'm hardly unique in that respect, Google have been giving a rankings boost to HTTPS for over two years.
Before you ask, I'm not going to tell you how to remove the Wix branding and use a custom domain without paying for those features, although that would be easy and could also solve the SSL problem. However, it would be a bit unfair to Wix and would also violate their terms and conditions.
This isn't about doing anything naughty, it's about providing missing functionality.
If you follow my instructions you won't be violating Wix's terms and conditions. This is important.
Background
If you've got a website from Wix then you can't serve it over HTTPS because they only have a generic wildcard SSL certificate. In other words, you could serve it over HTTPS, but this would happen:
Actually, let's not use that joke website[1], let's use a real one belonging to a friend of mine.
An aside about pancreatic cancer
A few years ago, one of my friends (we used to train together in the gym) died of pancreatic cancer. His name was Lee Price. We also have another family friend who has lost three members of her family to the disease, including her partner. A few weeks ago she and a friend successfully cycled, climbed, swam and ran 750 miles in seven days to increase awareness of the disease and to raise money for Pancreatic Cancer Action. You can read about it at https://www.fullcyclechallenge.co.uk. That's the Wix website we're going to fix. Have a look at the website. If you want to make a donation you can do so via a link at the bottom of the page, or directly via https://www.justgiving.com/fundraising/fullcyclechallenge. If you don't want to make a donation, that's completely fine too.
A quick note about default behaviour in Wix
The default behaviour for a Wix website is as follows (with my interpretation in italics):
- Requests to [http://domain.com](javascript:;) are redirected to [http://**www.**domain.com](javascript:;) (it adds www.) via an HTTP 301 redirect - that's okay
- Requests to [https://www.domain.com](javascript:;) result in the browser privacy warning shown above - that's not really okay
- Requests to [https://domain.com](javascript:;) fail (possibly with a time out) - that's definitely not okay
We're going to change that so that all of the above result in a 301 redirect to [https://www.domain.com](javascript:;) with the path and query string preserved.
Procedure for adding SSL support to a Wix website for free
This article assumes you have a Wix premium plan and that you've already connected your domain.
Overview
To do this you need to use CloudFlare as your DNS host (i.e. your name servers will be CloudFlare and they will host your DNS records). This is free and simple to set up. Then you need to activate SSL with CloudFlare and set a couple of page rules. This is all free and is explained (in considerable detail) below.
Sign up with CloudFlare
Go to CloudFlare and create an account (don't worry, we're going to use a free account).
Add domain
Login to CloudFlare and click + Add Site (top right). Enter your domain, click Begin Scan and wait about a minute, during which time it should look like this:

Once the progress bar is replaced by a green Continue Setup button, click it.
Check DNS Settings
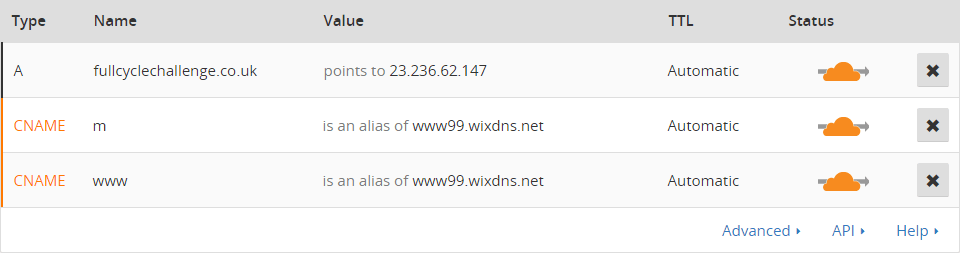
Now make sure the status clouds are orange (they should be by default). You should get something (very much) like this (I have changed the values to be those for tomgetsfit.com)
One of the many benefits of CloudFlare is that your root IP address is concealed. The actual A record for
tomgetsfit.compoints to the IP address23.236.62.147as you can see below, but if you check the address via ping or whois, you go via CloudFlare and get one of their IP addresses instead (I got104.27.130.101when I tried it just now).tomgetsfit.comis only a test site, so it doesn't matter that I just told you the IP address.
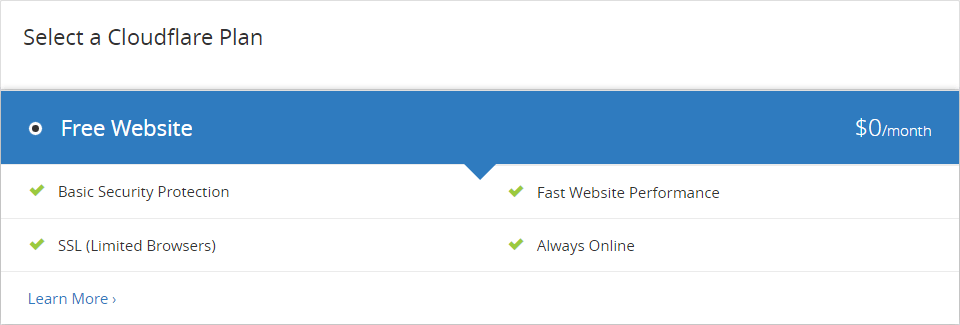
Once all of the clouds are orange, click the green Continue button  and choose the free plan (and perhaps marvel at the starting price of the Enterprise plan).
Change name servers
Next you will be instructed to change your name servers.
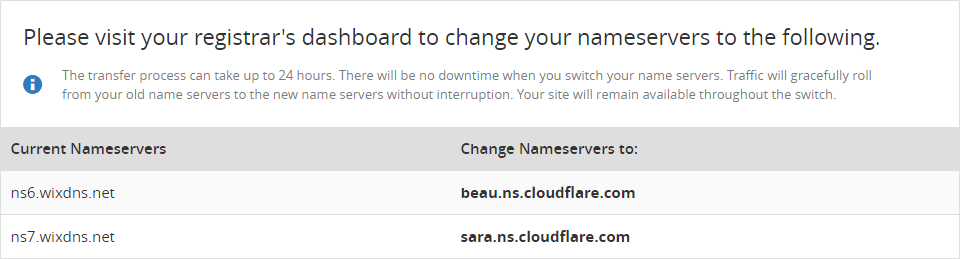
You need to change your name servers to be whichever ones were assigned by CloudFlare. They'll be of the format nnnn.ns.cloudflare.com. If you don't know how to do this, read this CloudFlare support document and choose the instructions for your registrar. This is probably the hardest part of the entire procedure.
Remember that name server changes can take 24 hours (but generally don’t).
UPDATE: 2016-11-07
NOTE: If you purchased your domain through Wix then they will not allow you to change your nameservers. This means that you will need to transfer your domain to use another registrar using these instructions. If you registered (or transferred) your domain in the last sixty days, you cannot transfer it. That's an ICANN rule. Thanks to Andres for bringing this to my attention (see the comments thread below).
Once you've changed your name servers, come back to CloudFlare and click Continue. You will be taken to the Overview where you will probably see something like this:
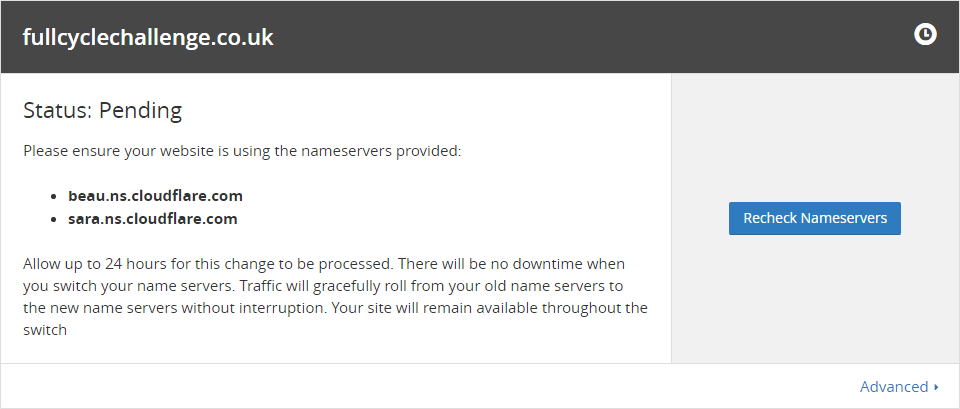
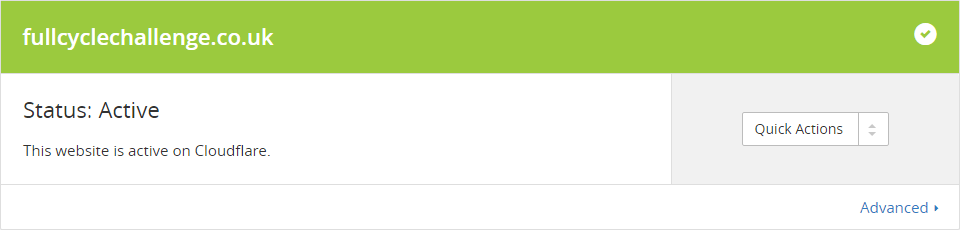
Click Recheck Nameservers and soon you will see this instead:
Set up SSL
Now click on the Crypto menu item:

Choose SSL → Full.
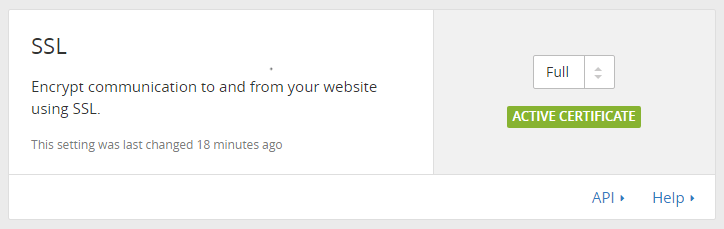
This means that traffic will be encrypted between the browser and CloudFlare and also between CloudFlare and Wix. It will use the *.wix.com certificate, but it won't validate it (in other words, it won't complain about the name mismatch). This means all traffic is encrypted, which is good because it means that all parts of the route are covered and nobody can inspect (or, more importantly, tamper with) any of your traffic. In theory, this is not entirely secure as somebody could hijack your traffic (by inserting their own SSL certificate, since CloudFlare aren't validating it), but using CloudFlare in the way I've described is actually okay for lots of reasons (e.g. since CloudFlare acts as a content delivery network, a lot of traffic is served from their cache so it actually is encrypted with a valid certificate throughout the entire network). It would take a long time to list the reasons why using SSL → Full is safe and, as luck would have it, Troy Hunt has already spent that time and written quite a lengthy article about why it's okay.
And remember, Wix told us the payment bit was secure (as it presumably goes to subdomain.wix.com or similar), so we're not involving that in our changes. It's all okay.
There's no reason to suppose that they will but, if Wix ever break their incomplete SSL implementation, you may need to revert to SSL → Flexible (and that would also be a good time to read Troy Hunt's blog post).
Remember to clear the SSL state from your browser
Web browsers cache SSL certificates. If you've just changed the SSL certificate for a particular site, you might not see your new certificate. Generally speaking, if you're not seeing what you're expecting to see, you should clear the SSL state of your browser.
If things don't work properly after changing an SSL certificate, try clearing the SSL state of the browser.
In Chrome go to Settings → + Show advanced settings → Network → Change proxy settings.... This will show the Internet Properties dialog box.
Now click on the Content tab and choose Clear SSL state to empty the cache of any SSL certificates.
I'm super-lazy[2], so I press Win and then type "int opt" and then press return as that selects Internet Options. Then I click on the Content tab and Clear SSL state as before.
Caching and Developer Mode
Before you set up your CloudFlare page rules (which is the next step) it will make life much easier if you enable Development Mode first, to make sure it isn't caching anything.
Click on the Caching menu item:

And scroll down and enable Development Mode:
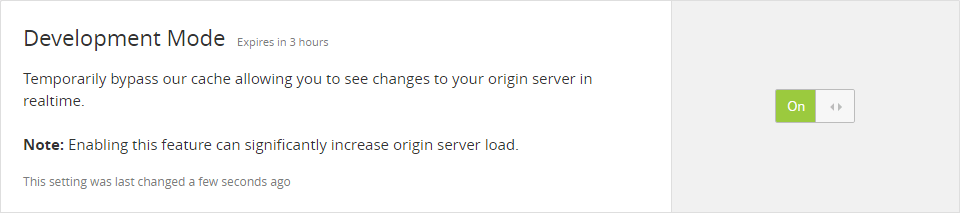
It will turn itself off after a few hours.
Create CloudFlare Page Rules
Once your free SSL certificate has been created and you can visit your website using HTTPS and see a green padlock (in Chrome) then it's time to fix the default behaviour we complained about earlier. Namely, to force all traffic to go via HTTPS and to add in www. automatically if it's absent.
You need to create two page rules.
Click on the Page Rules menu item:

First create a Forwarding URL to perform a 301 - Permanent Redirect on all traffic matching the pattern http://www.fullcyclechallenge.co.uk/* to send it to https://www.fullcyclechallenge.co.uk/$1 (the $1 part means it will preserve the path and query string represented by the * in the matching pattern). Like this:
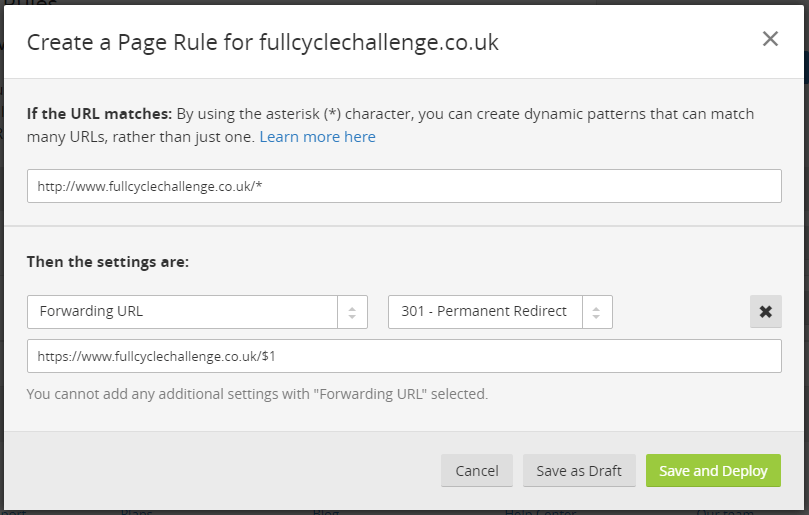
And the other rule is almost identical, except the pattern to match should not include the protocol or the www subdomain. In other words, just remove http://www. from the front.

Specifically, create a Forwarding URL to perform a 301 - Permanent Redirect on all traffic matching the pattern fullcyclechallenge.co.uk/* to send it to https://www.fullcyclechallenge.co.uk/$1
By choosing a 301 redirect, we're telling everybody (including search engines) that they used the wrong URL. This helps SEO as you won't have links to http, https, www. and domain.com versions of the same pages.
Done
At this point, everything is now complete. We've gone from this:
to this:
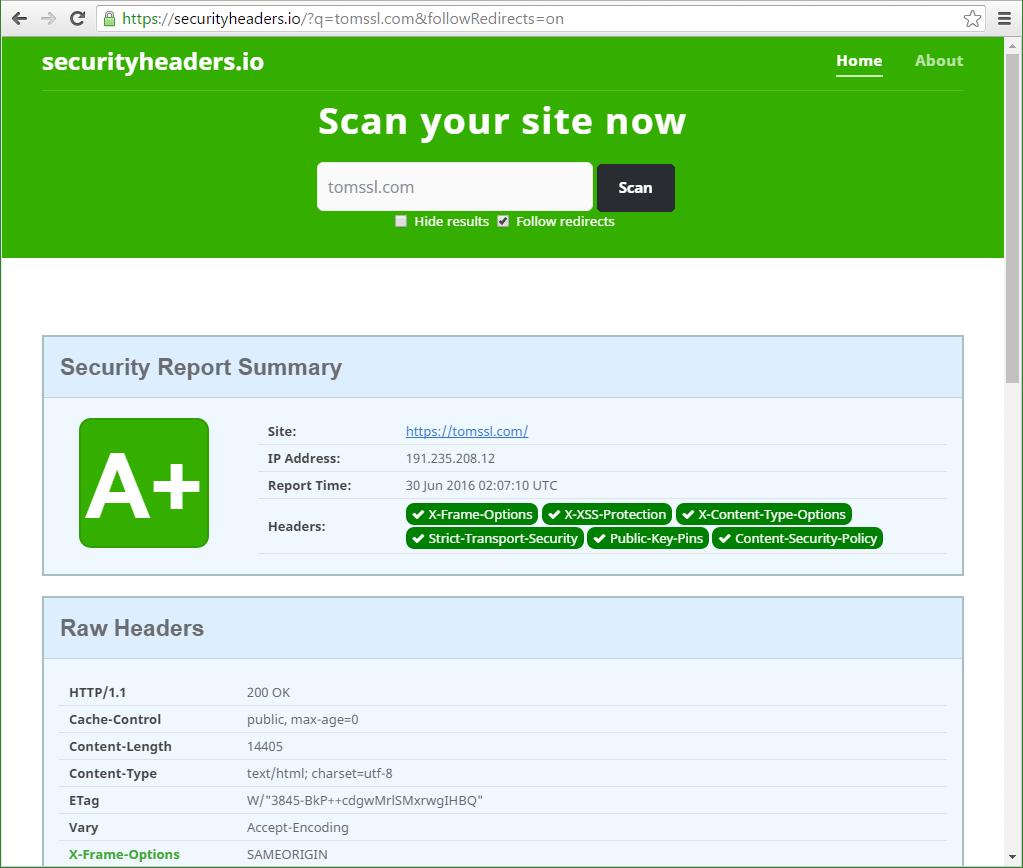
At the time of writing, my friend had set up the SSL certificate, but not the page rules. So https://www.fullcyclechallenge.co.uk/ works fine, but the automatic redirects don't. I'll update the article when that change is made but, in the meantime, to see the page rules in effect you can check out my test website. All of the following are automatically redirected to https://www.tomgetsfit.com/
http://tomgetsfit.com/
https://tomgetsfit.com/
http://www.tomgetsfit.com/
Conclusion
All web content should be served securely. Wix doesn't support HTTPS but, by spending five minutes, you can fix that for yourself. Since we know that, amongst other benefits, serving pages over HTTPS gives you a search engine rankings boost, then consider this some free SEO. You're welcome.
If you found this article interesting or useful (or neither), you can comment below, subscribe (I daresay you've just seen a pop-up of some kind suggesting you might like to do so) or follow me on Twitter (I'll probably follow you back). Follow @TomChantler
