

UPDATE 2023-05-27: Script now runs as a cron job. This GitHub issue has more details.
UPDATE 2022-06-07: Added CPU architecture detection (via a PR from GitHub user cobalt2727).
UPDATE 2022-04-16: Added fix for beta downloads.
Summary
If you run Plex on an Ubuntu server, then you need to install updates manually and that seems to involve going to the Plex website, searching for updates, downloading them and then figuring out how to install them. I probably did it about once before finding it to be too annoying, so I thought I'd automate it.
In this article, I'll show you how to write a tiny script which will download and install the latest version of Plex Media Server for Ubuntu and (optionally) tidy up after itself. Along the way, there'll be some useful tricks which can be used in other bash scripts.
Finally, I'll show you how you can make it run automatically (e.g. as a cron job). If you know there's a time when nobody will be watching anything, then that's a good idea. If you're anything like me, you'll probably choose to run it manually instead. Either is fine.
And, if you trust me completely and also can't bear the thought of actually learning anything, then feel free just to download the script and use it without even looking at it.
If you just want to grab the script directly from your Plex server, you can do this:
curl -sLOJ toms.sl/update-plex.sh
chmod +x update-plex.sh
Background
If you're already running your own Plex server on Ubuntu, then you've come to the right place. If you're thinking about running Plex, but worried that you don't have a good enough graphics card, then you should forget using a real graphics card and instead consider buying something with an Intel CPU with QuickSync for hardware transcoding. You might even have a suitable computer lying around. I bought a second hand HP ProDesk 600 G4 Mini with an Intel Pentium Gold G5400T and 8GB of RAM which uses hardly any power and is orders of magnitude better than you'd expect. It cost me about £120 at the time I bought it. In this article I'm not going to talk about installing Ubuntu and Plex on such a device and then enabling hardware transcoding, but there are lots of tutorials online and we can discuss it another time if you like.
What are we trying to do?
The purpose of this script is to turn this:
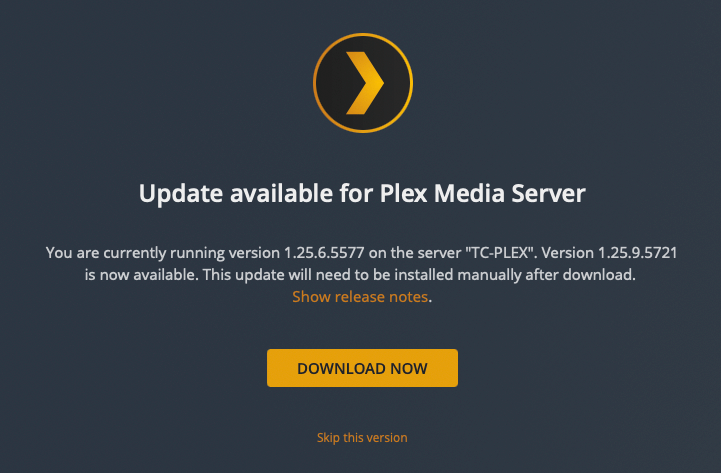
into this:
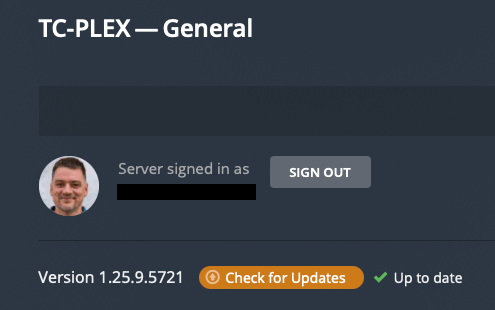
without having to do anything.
How to run it
Simply run the script with sudo, like this:
sudo ./update-plex.shBut first you need to install jq (JSON parser) by running:
sudo apt install jqIt would be quite easy to rewrite it not to have a dependency on jq, but I haven't done that yet (and I'm probably not going to). You can do it, if you like.
Here's what happened when I ran update-plex.sh just now:
And here's the output:
tom@tc-plex:~$ sudo ./update-plex.sh
Dry Run = false
Force Download = false
Overwrite File = false
Latest version:    1.25.9.5721-965587f64
Installed version: 1.25.6.5577-c8bd13540
------------------------------------------------------------
Need to upgrade...
Found latest version at https://downloads.plex.tv/plex-media-server-new/1.25.9.5721-965587f64/debian/plexmediaserver_1.25.9.5721-965587f64_amd64.deb
Downloading plexmediaserver_1.25.9.5721-965587f64_amd64.deb...
Installing it now...
(Reading database ... 149424 files and directories currently installed.)
Preparing to unpack plexmediaserver_1.25.9.5721-965587f64_amd64.deb ...
PlexMediaServer install: Pre-installation Validation.
PlexMediaServer install: Pre-installation Validation complete.
Unpacking plexmediaserver (1.25.9.5721-965587f64) over (1.25.6.5577-c8bd13540) ...
Setting up plexmediaserver (1.25.9.5721-965587f64) ...
PlexMediaServer install: PlexMediaServer-1.25.9.5721-965587f64 - Installation starting.
PlexMediaServer install:
PlexMediaServer install: Now installing based on:
PlexMediaServer install:   Installation Type:   Update
PlexMediaServer install:   Process Control:     systemd
PlexMediaServer install:   Plex User:           plex
PlexMediaServer install:   Plex Group:          plex
PlexMediaServer install:   Video Group:         render
PlexMediaServer install:   Metadata Dir:        /var/lib/plexmediaserver/Library/Application Support
PlexMediaServer install:   Temp Directory:      /tmp
PlexMediaServer install:   Lang Encoding:       en_US.UTF-8
PlexMediaServer install:   Intel i915 Hardware: Found
PlexMediaServer install:   Nvidia GPU card:     Not Found
PlexMediaServer install:
PlexMediaServer install: Completing final configuration.
PlexMediaServer install: Starting Plex Media Server.
PlexMediaServer install: PlexMediaServer-1.25.9.5721-965587f64 - Installation successful.  Errors: 0, Warnings: 0
Processing triggers for mime-support (3.64ubuntu1) ...
plexmediaserver_1.25.9.5721-965587f64_amd64.deb installed
Done
tom@tc-plex:~$
It checked the options (flags) I passed in, checked the currently-installed version of Plex, downloaded a newer version and installed it.
Let's see how it did all of that. Don't worry, I'm not going to list the entire script here (although it's pretty short).
Adding options to a bash script
It can be useful to pass option flags to a script, in order to do things like display help (usage instructions) or perform a trial run or to force certain behaviour. In our case, since we only want to pass simple options, here's how we're going to do it.
#!/bin/bash
# tomssl.com/update-plex-server-on-ubuntu-automatically
# Uncomment the next line if the script will be run as a cron job.
# PATH=/usr/local/sbin:/usr/sbin:/sbin:$PATH
plex_token=PUTYOURSHERE
beta_channel=false
dry_run=false
force_installation=false
overwrite_file=false
display_help=false

while getopts 'bhfno-:' opt; do
    case "$opt" in
        b) beta_channel=true ;;
        h) display_help=true ;;
        f) force_installation=true ;;
        n) dry_run=true ;;
        o) overwrite_file=true ;;
        -) case "${OPTARG}" in
             beta) beta_channel=true ;;
             dry-run) dry_run=true ;;
             force) force_installation=true ;;
             help) display_help=true ;;
             overwrite) overwrite_file=true ;;
             *) if [ "$OPTERR" = 1 ] && [ "${opt:0:1}" != ":" ]; then
                        echo "Unknown option --${OPTARG}" >&2
                        exit 1
                fi ;;
           esac ;;
        *) echo "Error: the only valid options are --beta, -b, --dry-run, -n, --force, -f, --help, -h, --overwrite, -o" >&2
           exit 1
    esac
done
At first, this looks quite complicated, but it isn't really. First we check the first character after the leading - and, if it's b, h, f, n or o, then we know what to do. And this works in a loop (note the while), meaning that we can use several options after a single dash and the order doesn't matter.
If the next character after the first dash is another dash, then that means we've got -- which means that we're using a longer version of that option (e.g. --help instead of -h), so we need to check the next word, or option argument (we use ${OPTARG} in the script).
The *at the end is basically a catch-all or default option, telling us that we've had some unexpected input, so we display a (vaguely) friendly error message. There are two of these asterisks: one to catch rogue options beginning with - and one to catch those beginning with --.
Displaying simple usage instructions for a bash script
Having added the -h option as shown above, the easy way to display usage instructions is just to check for that flag and then display the help and exit the script, like this:
if [[ $display_help == true ]]; then
  echo "usage: $0 -h, --help, -b, --beta, -f, --force, -n, --dry-run, -o, --overwrite"
  exit 2
fi
Why exit code 2? Well, to be honest, I'm not really sure because we're not really supposed to use exit code 2. However, 0 means success and we haven't actually run our script to completion successfully and 1 means failure and that's not what happened either. You can change it if you like. The range for exit codes is 0-255 and it just wraps around, so if you choose 1337 then it will actually be 57, because that's 1337 mod 256. And if you choose -1337 it will be 199, because that's -1337 mod 256. You don't need me to explain this, just leave the exit code as 2 and forget about it.
Forcing a bash script to run as root
This is very easy to do. Just add this after the usage instructions, but before you actually try to do anything that requires root privileges:
if [[ $EUID -ne 0 ]]; then
    echo "$0 is not running as root. Try using sudo."
    exit 2
fi
What happens if it's already up to date?
Nothing much. Here's the output from when I ran it just now:

tom@tc-plex:~$ sudo ./update-plex.sh
Dry Run = false
Force Download = false
Overwrite File = false
Latest version:    1.25.9.5721-965587f64
Installed version: 1.25.9.5721-965587f64
------------------------------------------------------------
Already on latest version.
Done
tom@tc-plex:~$
How does it know which version of Plex is currently installed?
It's really easy. It's this bit:
dpkg -s plexmediaserver | grep -i '^Version' | cut -d' ' -f2You can try it with other things, too, of course. Remember I said we need to install jq? You can check the current version exactly as you'd imagine:
dpkg -s jq | grep -i '^Version' | cut -d' ' -f2
1.6-1ubuntu0.20.04.1
A note about the Beta/PlexPass Channel
If you want to download the very latest (beta) version of Plex, then you have to have bought a PlexPass and also be authenticated when you grab the json file containing the downloads. The way this is done is by passing in a header containing X-Plex-Token. And the way that is done in the script is by pasting the token in, right at the top of the file, like this:
#!/bin/bash
# tomssl.com/update-plex-server-on-ubuntu-automatically
# Uncomment the next line if the script will be run as a cron job.
# PATH=/usr/local/sbin:/usr/sbin:/sbin:$PATH
plex_token=PUTYOURSHERE
beta_channel=false
Then you just need to pass in the -b or --beta flag when you run the script.
Don't worry too much if you get the token wrong. Everything will still (mostly) work, you just won't be able to get the beta channel downloads.
Here's how I obtained my token.
First I navigate to https://www.plex.tv/media-server-downloads/ in my browser and made sure I was logged in (there will be a link inviting you to login if you aren't). Then I checked the request headers for the request to get one of the json files (e.g. 5.json). I did this by checking the Network tab in the developer tools in the browser.
Here's a picture with most of the relevant parts highlighted. The black redacted bit is my token. Grab yours and paste it into the top of the script.
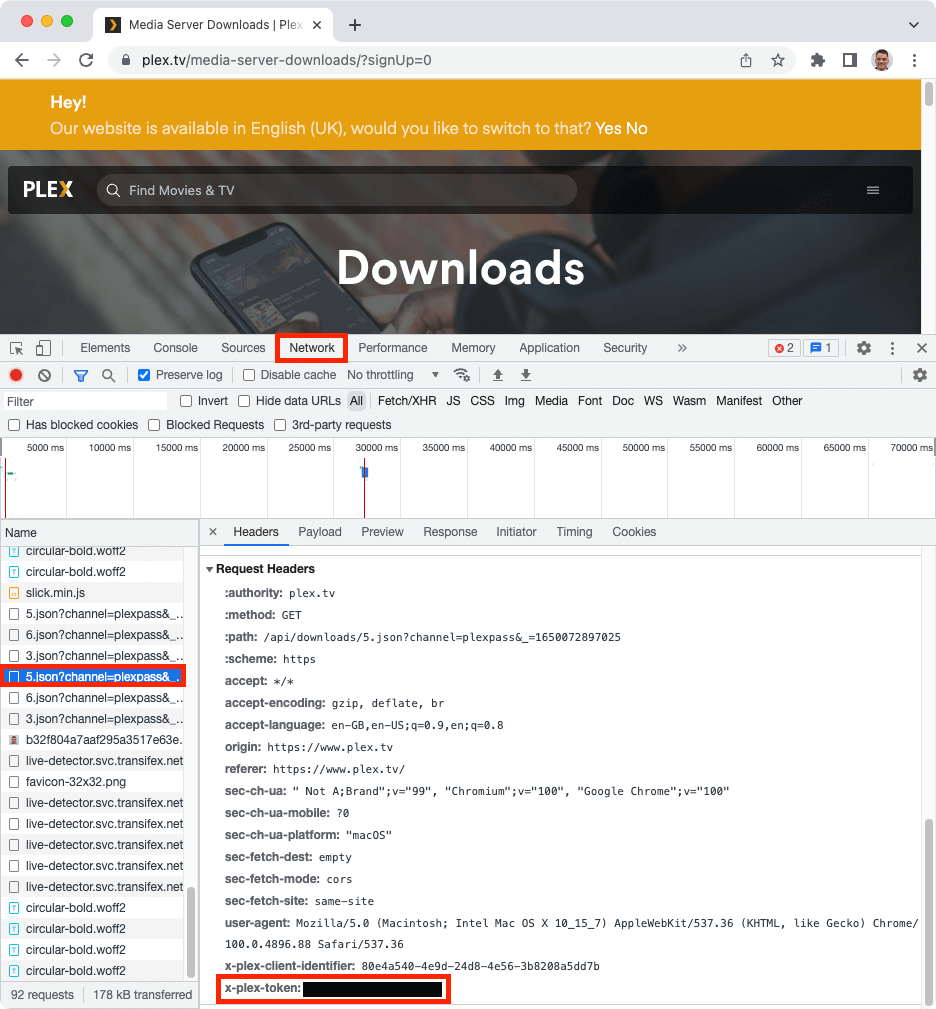
This seems everso slightly abstruse, but it seems that my token doesn't expire for twenty years, so I shouldn't need to update it in my script very often.
Bonus: Backing up your Plex Server Metadata
This is a short script which compresses your Plex metadata and then sends it somewhere via rsync. Since I don't know where you want to send it, I can't give you the complete file, but I can show you almost exactly what to do.
Make a file called backup-plex.sh that looks roughly like this (the rsync command will need to know the details of your ssh key, your backup server and username and the remote path, of course).
#!/bin/sh
archivefilename="$(hostname)_backup_$(date +%Y%m%d_%H%M%S).tar.gz"
tar --use-compress-program="pigz -6 --recursive" -cf ~/backup/$archivefilename -C / var/lib/plexmediaserver/Library/Application\ Support/Plex\ Media\ Server/
# tar cfa ~/backup/$archivefilename -C / var/lib/plexmediaserver/Library/Application\ Support/Plex\ Media\ Server/
echo Plex MetaData compressed and saved as $archivefilename
rsync --progress -zzarh -e "ssh -i ~/.ssh/plex-backup-rsync-key" ~/backup/$archivefilename backup-username@backup-server:/path/to/backup/plex
Note: I am using pigz to do my compression, as it is generally faster than gzip. If you don't want to do that, just change the bit that says --use-compress-program="pigz -6 --recursive" -cf to be cfa, but leave everything else the same. I've put it in the script above (commented out).
And the output looks like this:
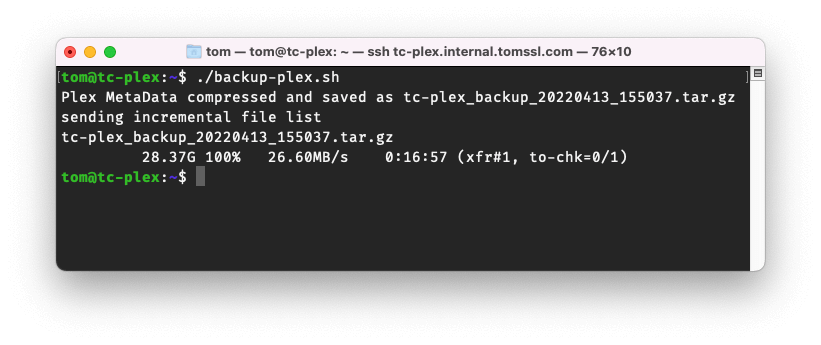
tom@tc-plex:~$ ./backup-plex.sh
Plex MetaData compressed and saved as tc-plex_backup_20220413_144920.tar.gz
sending incremental file list
tc-plex_backup_20220413_144920.tar.gz
         28.37G 100%   27.52MB/s    0:16:23 (xfr#1, to-chk=0/1)
If you're wondering why the tar command has this bit: -C / var/lib/plexmediaserver/Library/Application\ Support/Plex\ Media\ Server/ it's because, if you don't want this to happen:
tar: Removing leading `/' from member names
tar: Removing leading `/' from hard link targets
then you have to tell the tar command to change directory before it compresses the files and then tell it to use a relative path (not an absolute path). That's what the -C / var/lib/... bit does.
Enhancements
We could make it check the system architecture, but I know mine is Thanks to cobalt2727 for doing this work for me.amd64_deb, so I didn't bother.
We could make it delete old Plex downloads (or backups). Maybe via a flag? --delete-older-than-n-days 180 or --keep-last-n-versions 3. I don't need to do anything that compliacted, but I do have finite disk space, so let's see how to delete old files automatically.
Delete old Plex downloads and old backups
Here's a way to delete all backup files more than half a day old. In other words, it will delete all of the backups except the one we have just taken. I do this because I archive my backups to another server using rsync, so I do keep them somewhere; I just don't keep them on my Plex server.
I haven't included this bit in my script, because it's really dangerous to run commands like this, in case you make a mistake. So, before running the destructive version, try running the version which just echoes the name, to make sure you're looking in the right directory.
The dangerous version (that deletes stuff):
find /path/to/backup -mtime +0.5 -exec rm {} \;
The safe version (that just lists files):
find /path/to/backup -mtime +0.5 -exec echo {} \;
e.g. in order to list old downloads, use the command like this:
tom@tc-plex:~$ find ./plexmediaserver_* -mtime +0.5 -exec echo {} \;
./plexmediaserver_1.25.6.5577-c8bd13540_amd64.deb
Scheduling the scripts to run automatically
To run a backup every night at 2am and an update at 3am, run crontab -e and add two lines, like this:
0 2 * * * /path/to/backup-plex.sh
0 3 * * * /path/to/update-plex.sh
I run the backups automatically, but not the updates.
NOTE: If you're going to run the update script as a cron job, don't forget to uncomment the line that says:
PATH=/usr/local/sbin:/usr/sbin:/sbin:$PATH
I have explained why this is necessary in this GitHub issue.
Conclusion
In this article we (eventually) saw how to write a simple script to update Plex Server on Ubuntu. Along the way, I told you more than you wanted to know about checking if bash scripts are running as root, passing (and parsing) options and displaying simple usage instructions. And then there was a bonus script to backup your Plex metadata. I hope you found some of it useful.