
Summary
In this article I'll teach you how to use the Azure CLI to create an Azure Key Vault, populate it with some secrets (getting round some annoying problems relating to escaping special characters) and then retrieve those secrets.
This is preparation for the next article, in which we'll create an Azure Functions App, change the access rules on the Key Vault so that the secrets can be retrieved by that specific Azure Functions App, put links to those secrets into the Azure Functions App and then retrieve and show those secrets at run time. When that article is published (in the next few days), there'll be a link to it here.
The last time I wrote about the Azure CLI, I ran it in a Docker container. You can see how to do that here.
This time, I'm going to use PowerShell and install the Azure CLI. You can find instructions at: https://docs.microsoft.com/en-us/cli/azure/install-azure-cli?view=azure-cli-latest
Background
Azure Key Vault is basically cheap, secure cloud storage for sensitive information such as keys, passwords, certificates, etc, protected by industry-standard algorithms, key lengths, or even hardware security modules (FIPS 140-2 Level 2 validated HSMs).
We've all seen source code containing some of this sensitive data (sometimes in public repositories in GitHub). Judicious use of Key Vault is a great way to prevent this from happening. Access to Key Vault requires proper authentication and authorisation and, in the next article in this series, we'll be granting access to our key vault to a simple Azure Functions App which we'll create. Not only that, we won't need to change any of our existing code, so it will literally only take a few minutes to add secure secret retrieval at run time to our app.
Let's get started.
Run the Azure CLI and login to your account
First, we need either to run the Azure CLI Docker container, or to run PowerShell and install the latest version of the Azure CLI by running this command:

PS C:\dev\TomSSL> Invoke-WebRequest -Uri https://aka.ms/installazurecliwindows -OutFile .\AzureCLI.msi; Start-Process msiexec.exe -Wait -ArgumentList '/I AzureCLI.msi /quiet'
Then we login to Azure using the az login command.
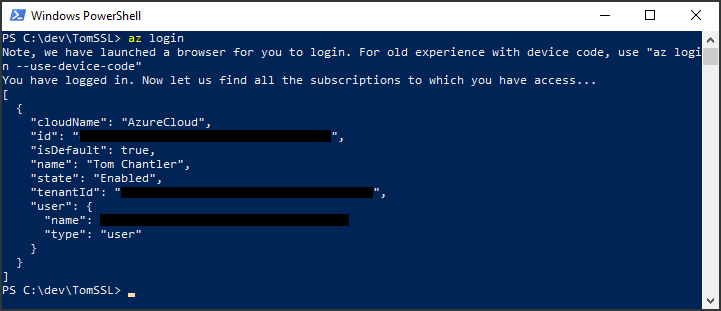
PS C:\dev\TomSSL> az login                                                                          Note, we have launched a browser for you to login. For old experience with device code, use "az login --use-device-code"
You have logged in. Now let us find all the subscriptions to which you have access...
[
  {
    "cloudName": "AzureCloud",
    "id": "<redacted>",
    "isDefault": true,
    "name": "Tom Chantler",
    "state": "Enabled",
    "tenantId": "<redacted>",
    "user": {
      "name": "<redacted>",
      "type": "user"
    }
  }
]
PS C:\dev\TomSSL>
Create a Resource Group to store your Key Vault
Before we go any further, we ought to create a new resource group as a container for all of the resources for this demo.
az group create -l uksouth -g tomssl-key-vault-demo --tags Environment=Demo 'Reason=Blog Articles'
Notice that we need to put the resource tag in quotes if it contains spaces.
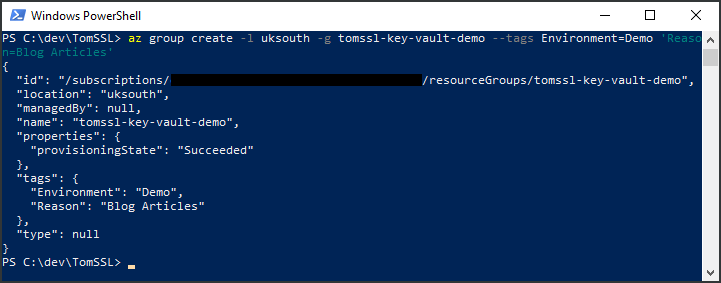
PS C:\dev\TomSSL> az group create -l uksouth -g tomssl-key-vault-demo --tags Environment=Demo 'Reason=Blog Articles'                                                                                    {
  "id": "/subscriptions/<redacted>/resourceGroups/tomssl-key-vault-demo",
  "location": "uksouth",
  "managedBy": null,
  "name": "tomssl-key-vault-demo",
  "properties": {
    "provisioningState": "Succeeded"
  },
  "tags": {
    "Environment": "Demo",
    "Reason": "Blog Articles"
  },
  "type": null
}
If you want to see a list of Azure locations, run this:
az account list-locations.
If you get stuck on anything in the Azure CLI, try appending--help(or simply-h) to your command. The context-sensitive help is really good.
Create a Key Vault
Now we need to create an empty Key Vault in which to store our secrets. This will take several seconds...
az keyvault create -n tomssl-test-kv -g tomssl-key-vault-demo -l uksouth --tags Environment=Demo 'Reason=Blog Articles'

PS C:\dev\TomSSL> az keyvault create -n tomssl-test-kv -g tomssl-key-vault-demo -l uksouth --tags Environment=Demo 'Reason=Blog Articles'                                                               {
  "id": "/subscriptions/<redacted>/resourceGroups/tomssl-key-vault-demo/providers/Microsoft.KeyVault/vaults/tomssl-test-kv",
  "location": "uksouth",
  "name": "tomssl-test-kv",
  "properties": {
    "accessPolicies": [
      {
        "applicationId": null,
        "objectId": "9e96dbed-e34a-4125-98f3-2cfa723f3f4a",
        "permissions": {
          "certificates": [
            "get",
            "list",
            "delete",
            "create",
            "import",
            "update",
            "managecontacts",
            "getissuers",
            "listissuers",
            "setissuers",
            "deleteissuers",
            "manageissuers",
            "recover"
          ],
          "keys": [
            "get",
            "create",
            "delete",
            "list",
            "update",
            "import",
            "backup",
            "restore",
            "recover"
          ],
          "secrets": [
            "get",
            "list",
            "set",
            "delete",
            "backup",
            "restore",
            "recover"
          ],
          "storage": [
            "get",
            "list",
            "delete",
            "set",
            "update",
            "regeneratekey",
            "setsas",
            "listsas",
            "getsas",
            "deletesas"
          ]
        },
        "tenantId": "<redacted>"
      }
    ],
    "createMode": null,
    "enablePurgeProtection": null,
    "enableSoftDelete": null,
    "enabledForDeployment": false,
    "enabledForDiskEncryption": null,
    "enabledForTemplateDeployment": null,
    "networkAcls": null,
    "provisioningState": "Succeeded",
    "sku": {
      "name": "standard"
    },
    "tenantId": "<redacted>",
    "vaultUri": "https://tomssl-test-kv.vault.azure.net/"
  },
  "resourceGroup": "tomssl-key-vault-demo",
  "tags": {
    "Environment": "Demo",
    "Reason": "Blog Articles"
  },
  "type": "Microsoft.KeyVault/vaults"
}
Now let's add a secret to our Key Vault
First, we'll set some variables to make it a bit easier. Just cut and paste the next four lines and it will denote that it's a multiline statement by adding >> automatically.

$resourceGroup = "tomssl-key-vault-demo"
$keyvaultName = "tomssl-test-kv"
$secretName = "TestSecret"
$secretValue = "ThisIsATestSecret!"
Now run the following command to create your first Key Vault secret:
az keyvault secret set -n $secretName --vault-name $keyvaultName --value $secretValue
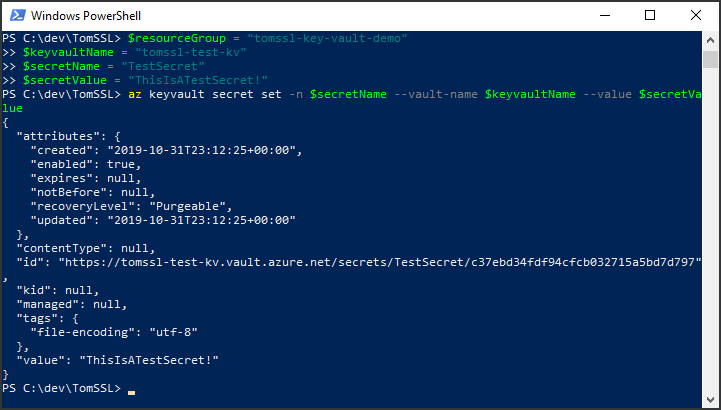
PS C:\dev\TomSSL> az keyvault secret set -n $secretName --vault-name $keyvaultname --value $secretValue                                                                                                 {
  "attributes": {
    "created": "2019-10-31T23:08:41+00:00",
    "enabled": true,
    "expires": null,
    "notBefore": null,
    "recoveryLevel": "Purgeable",
    "updated": "2019-10-31T23:08:41+00:00"
  },
  "contentType": null,
  "id": "https://tomssl-test-kv.vault.azure.net/secrets/TestSecret/f7953b248a3e46cfa6fc59651794db2e",
  "kid": null,
  "managed": null,
  "tags": {
    "file-encoding": "utf-8"
  },
  "value": "ThisIsATestSecret!"
}
Notice the id value, which contains a URI for this specific version of this specific secret. Since we're likely to want that later (in the second article of this series about Key Vault), let's create it and grab it for future use in the same step. Like so:
$secretId = (az keyvault secret set -n $secretName --vault-name $keyvaultName --value $secretValue | ConvertFrom-Json).id
Which gives this output:

PS C:\dev\TomSSL> $secretId = (az keyvault secret set -n $secretName --vault-name $keyvaultName --value $secretValue | ConvertFrom-Json).id PS C:\dev\TomSSL> $secretId https://tomssl-test-kv.vault.azure.net/secrets/TestSecret/fc1b64512a7243818ccd9ed0fd333814
Observe that the long guid-looking part of the URI after the secret name has changed. That's because, even though we've set the same value as last time, we have created a new version of this secret, so there are now two versions.
If you want to get the latest id (which is a URI) of a named secret (e.g. so you can squirt it into you CI/CD pipeline, perhaps), you can do it like this using the Azure CLI.
$retrievedSecretId = (az keyvault secret show -n $secretName --vault-name $keyvaultName | ConvertFrom-Json).id

PS C:\dev\TomSSL> $retrievedSecretId = (az keyvault secret show -n $secretName --vault-name $keyvaultName | ConvertFrom-Json).id PS C:\dev\TomSSL> $retrievedSecretId https://tomssl-test-kv.vault.azure.net/secrets/TestSecret/fc1b64512a7243818ccd9ed0fd333814
There is work underway to enable you to use a single URI which will always retrieve the latest version of a secret but, for the time being, you need to specify the version in the URI (this is slightly annoying and will become relevant when we're using the secret in our Function App in the next article).
What about special characters?
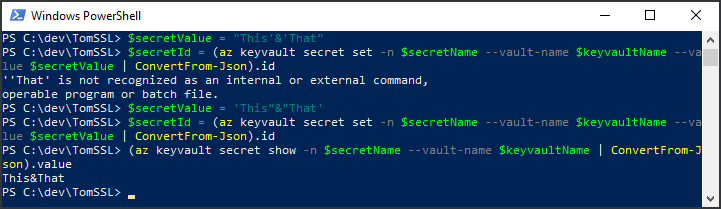
If you try to set a secret which contains an ampersand, it will go wrong. You need to escape the ampersand by wrapping the ampersand in double quotes and the rest of the secret in single quotes. If you reverse the quotes, it won't work.
$secretValue = 'This"&"That'works.
$secretValue = "This'&'That"doesn't work.
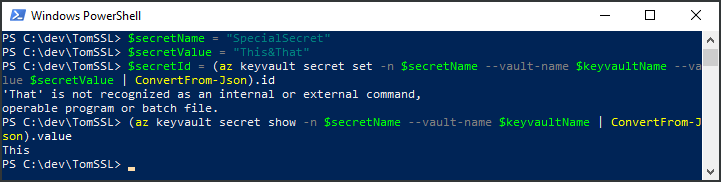
PS C:\dev\TomSSL> $secretName = "SpecialSecret"
PS C:\dev\TomSSL> $secretValue = "This&That"
PS C:\dev\TomSSL> $secretId = (az keyvault secret set -n $secretName --vault-name $keyvaultName --value $secretValue | ConvertFrom-Json).id                                                             'That' is not recognized as an internal or external command,
operable program or batch file.
PS C:\dev\TomSSL> (az keyvault secret show -n $secretName --vault-name $keyvaultName | ConvertFrom-Json).value                                                                                          This

PS C:\dev\TomSSL> $secretValue = "This'&'That"
PS C:\dev\TomSSL> $secretId = (az keyvault secret set -n $secretName --vault-name $keyvaultName --value $secretValue | ConvertFrom-Json).id                                                             ''That' is not recognized as an internal or external command,
operable program or batch file.
PS C:\dev\TomSSL> $secretValue = 'This"&"That'
PS C:\dev\TomSSL> $secretId = (az keyvault secret set -n $secretName --vault-name $keyvaultName --value $secretValue | ConvertFrom-Json).id                                                             PS C:\dev\TomSSL> (az keyvault secret show -n $secretName --vault-name $keyvaultName | ConvertFrom-Json).value                                                                                          This&That
This was quite tricky to work out and there might be a better way of dealing with this, but I haven't yet found one. It's not the end of the world, just something to bear in mind when you're using Key Vault.
Conclusion
Azure Key Vault Secrets are an inexpensive and extremely secure way to store sensitive data for use in various applications (which we will investigate in subsequent articles). Key Vault Secrets are easy to manage through the Azure CLI, but you need to be careful when dealing with special characters, such as ampersands.
Join the newsletter to receive the latest updates in your inbox.

Hire me for consultancy work
